By Contributor: Mahima
Continuing with our weekly tutorial feature, Tuesdays are now Trick Tuesdays because this section will feature makeup tutorials on all those tricks which look difficult but are actually quite simple. Today we will share tips and tricks on contouring Indian Skin along with a step by step tutorial on how to do it. Sounds difficult? But it’s really not, trust me ITS NOT. You just need a contouring powder, which is nothing special but just a powder which is 2-3 shades darker than your actual skin tone. There are many contouring products available in the market ranging from liquid, cream, compact powders to loose powder. Personally I feel that compact powders are the easiest to work with as its just like applying a blush but at different parts of the face.
Difference Between Contouring and Bronzing:
And here I clear the big confusion which is between CONTOURING and BRONZING, well there’s a slight difference between the two terms. Contouring is using a darker shade to shade the the parts of the face that want to push back and look thinner, for example double chin, you can use a darker shade over the bulged area to make it appear a bit lifted up and a contouring powder should always be MATTE as a shimmery one will draw attention to the contoured parts and will make them stand out.
While bronzing is giving your face a tan or sun kissed look. Now if you have a lighter foundation which happens to most of us where the MUAs give us a lighter shade to make us look fair (I seriously wanna kill these kind of MUAs) you can use a bronzer to darken it a bit and a bronzer could be shimmery so that you can get the JLO glow!
Plus ATTENTION LADIES, get a contour according to your skin’s undertones which are basically either COOL or WARM or NEUTRAL
Now lets move on to the tutorial on how to actually contour your face to give that KIM KARDASHIAN CHISELED LOOK!
So here I’m using MAC harmony blush as I LOVEEE IT but you really don’t have to buy that. You can use inglot amc powder (shade 31 if you are an nc30-nc40), benefit hoola face powder or you can use an eyshadow as well.
Step 1: LADIES.. just POUT, no I’m not clicking you but yes JUST POUT and make that famous fishy face.
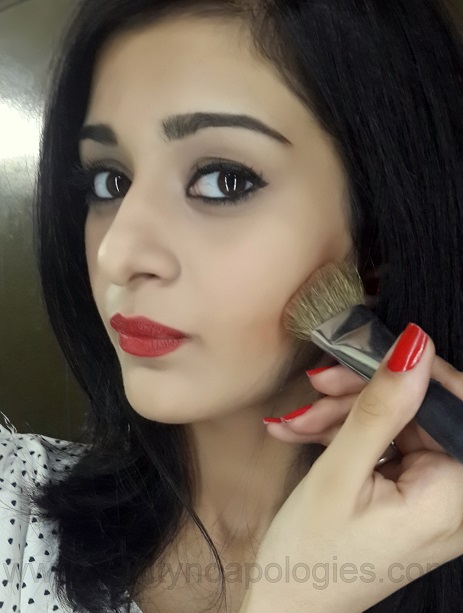
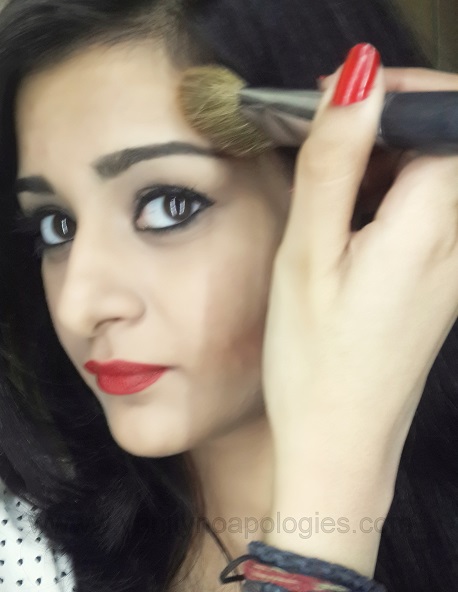
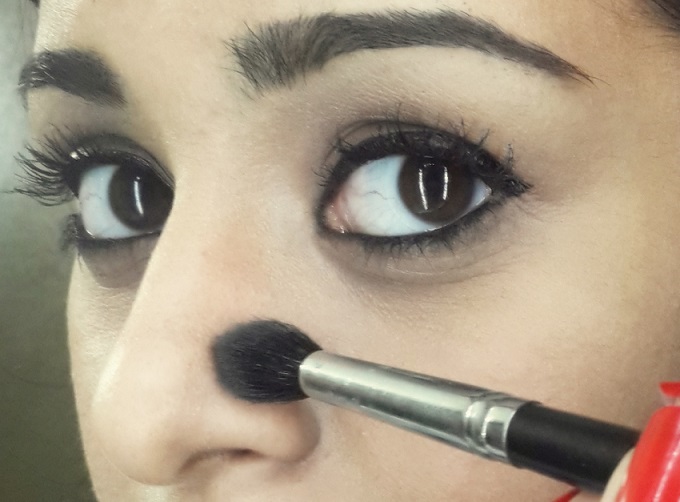
Step 2: now you’ll be able to notice that your check bones have been lifted and a shadow is being casted by them so now use an angled brush OR just a normal brush OR a fluffy blending brush if you wanna be precise and apply the powder where ever the shadow is being casted. (you don’t have to be so heavy handed, I just did it for the sake of the tutorial)
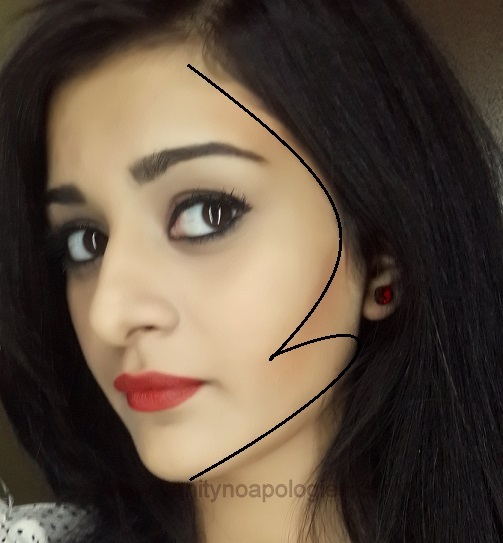
Step 3: now here comes a little mathematics! To contour your temples make a line PERPENDICULAR to the line under your cheek bones. Like a 90 degree angle where they meet. Refer to the second photo of this post.
Step 4: now to contour the jaw line make a line PARALLEL to the line under your cheek bones you made in Step 2. Again refer the second photo for the basic idea.
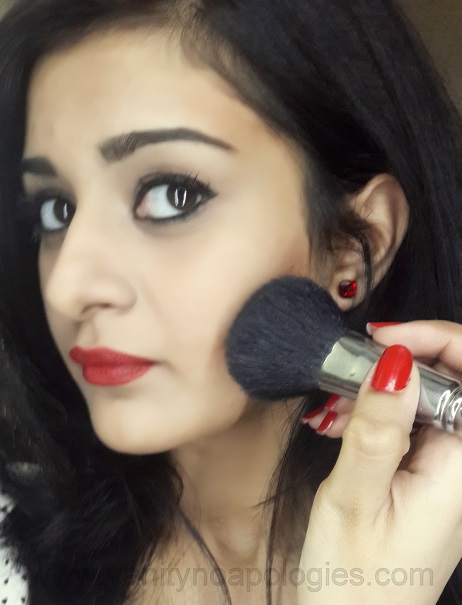
Step 5: now grab a fluffly brush and blend it all in 3 way motion, don’t know what it is ? Basically if you’ll join all these lines made it will form a 3 so blend it in that motion without adding any more product. (refer the 3 on my face)
Step 6: So if you wanna contour you nose then just forget about that myth of making two lines on either side of the nose. Trust me that looks so ramleela types! So basically you wanna put this powder on the parts of your nose which you want to push back, if your nose is kind of tilted or crocked apply it on the side which seems to be crocked and not on the other side.
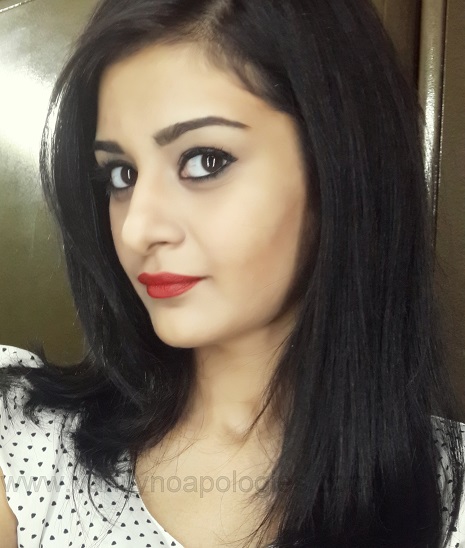
And tadaa this is the final look. You can see how it has made a difference to my overall appearance. My face looks thinner and chiseled. Contouring can be done to make a round face slimmer, your nose longer, your jaw line sharp, chin pointy and what not. So now go ahead and get those bronzing powders out and start practicing. And let me know if you have any requests for the next tutorial.
Review, Price and Buy Online Moha Foot And Nail Cream At this point I might… Read More
Earlier this year I had this crazy idea to colour my hair bright pink. We… Read More
Review, Price, Buy Online Charmis Deep Radiance Face Serum with Vitamin C Vitamin C is… Read More
Review, Price, Buy Online Head & Shoulders Neem Anti Dandruff Shampoo I have this habit… Read More
Head & Shoulders Active Protect 2 in 1 Anti Dandruff Shampoo + Conditioner Review, Price,… Read More
Livogen Adult Tonic #RahoStrongIronStrong The past few months have been crazy, we can all agree… Read More
View Comments
OMGGGGGG..mahima u got to tell me your skincare routine...or which foundation are u using??? you look absolutely gorgeous and the tutorial is so very helful...will definitely try the techniques!!!
Milyy♡♡ thankyou so much :* and I do use mostly DIY face masks for my skin which includes turmeric, honey and lemon face mask.
And I'm wearing loreal magic souffle in this tutorial :*
great tutorial I would also like to know abt ur foundation as I have same skin tone as well, are u around Mac Nc 30 ??
and BTW which lipstick r u wearing :D
Thankyou ♡ and I'm wearing loreal magic souffle in the shade ivory. And I'm around nc25 :) and the lipstick is lakme 9-5 in the shade red coat.
Gal u're hot! ever since I learnt contouring I cannot do without it as it really does make a huge difference especially in pics!
Thankyouu lisha♡ yes contouring does make a huge difference.
Mahimaaaa u r suprrrrrr pweeeeety ♥♥♥♥
Loved the technique.. u explaind it so wel...bookmarkd ... ★★
Eeeeeee♡♡ thankyouu swattiii♡♡♡
Oh man you are so pretty Mahima, loved this post a lot.
Thankyou so much arzoo♡♡
Duddeee !!! U loookkkk hawwwwttttt *-* lurrrvvvv d tute :-*
Thankyou so so much ♡♡
Great tutorial!
Thankyou gawthamii♡
pretty lady, you! and very well explained contouring! such an addictive part of makeup it is! <3
Thankyou so much ritu♡
you're super pretty and you've explained it so well :) my face is already very angular though so i never contour lol.. nice to know how it's done though!
Thankyouu aditi♡ :*
Hey please tell about all the products that you have used..you look amazing